Building a new fence is a guaranteed way to add security, privacy, and boost your home’s curb appeal. Fences also come in a wide range of styles, designs, and colours that can complement your home and landscape. Not only that, but knowing how to build a fence can be done as a DIY project. Before you can build your fence, though, there are few things you need first. With fences, that includes the right tools, materials, and of course, knowing what type of fence you want!
What to consider before building your fence
Before buying the materials and building a fence, there are few factors to know. When you work with a professional contractor, these are typically taken care of by the contractor. DIYing a fence, though, means that as a homeowner, you need to be informed. That includes knowing about permits, bylaws, locations of buried utilities, and the landscape of your yard. Knowing these saves time and stress, as well as unexpected costs.
Permits
Depending on where you live and what type of fence you have planned, you may need a permit. Permits are required for two reasons:
1. You are building a fence that is higher than the bylaw height restrictions. Or,
2. You are building a fence for a pool enclosure.
Other cities may require permits for specific materials, such as a concrete or masonry fence. Information on fence permits can always be found online and through the official municipality website. Even if you assume a permit isn’t required, always double-check to avoid any unexpected legalities or specific rules.
Bylaws
The bylaws will vary as well, but usually, establish what materials are allowed or how high a fence can be. In Canada, most height bylaws are typically set as such:
Backyard yard height limit: 2.0 m (6ft. 6 in)
Front yard height limit: 1.2 m (4ft. 0 in.)
Keep in mind that these heights can vary by different juristictions, so always look up your local fence bylaws first. You will save money and possibly wasted time, but you’ll also avoid any legal disputes with neighbours over heights and locations. If you are building a new fence between properties, talk to your neighbour first. It’s not required by law, but it’s a nice courtesy when putting up a new fence that’ll affect their property as well. In some cases, the neighbour might offer to help with the cost of the shared fence.
Bylaws may also restrict the type of material you can use for a residential fence. Most cities across Canada follow the same building material allowance and restrictions for residential fences. Materials such as wood, brick, concrete, vinyl, and metal, are commonly used and approved materials. However, barbed wire or electric fences are not allowed. Before you buy any materials, check what your local bylaws do or don’t permit.
Check underground
Since building a fence requires some digging, you must call your utility company first. A buried cable, gas line or pipeline are potentially severe safety hazards if damaged. They can also affect the location where you originally planned to build a fence. Call in a professional utility company first, and they will come to mark your yard so you know where it’s safe to dig and where it’s not. Take the time as well to check where any trees are located, since underground roots can damage the fence posts. If you do have to move the fence’s location, make sure you know the boundaries of your property. That way you will safely avoid any buried utilities or roots, as well as accidentally crossing into your neighbours’ yards.
Landscape and climate
Building before knowing the landscape invites unnecessary stress and possibly extra expenses. Uneven ground or rocky soil may make building a fence more complicated or lead to an uneven finish. Before you start, take note of your back or front yard. A little landscaping may be necessary to even the ground or added planning to build a straight fence. Beware that overhanging branches may damage the fence, so take the time to trim them ahead of time. If you are working with uneven ground, a staggered fence design is another possibility. It adds an aesthetically different style but will need to be planned ahead of time.
Frost heave: In Canada, the colder climate will play a role in building a fence. Frost heave, in particular, happens as water in the soil freezes and then later thaws. As this happens, the pressure causes the soil to “heave” and effectively push the fence post from the ground. This shift happens gradually, so it may take time before you notice any crooked posts.
Depending on where you live in Canada, this problem will be more or less problematic. At the same time, other areas in Canada won’t ever have to worry. There are a few ways to prevent frost heave, such as digging the post below the frost line. Other techniques include a layer of gravel under the concrete slab or putting a drainage system in place. These methods help make the soil less susceptible to frost and heaving as a result. Speak to your land surveyor to find out where, if at all, the frost line is located and plan accordingly.
Building materials
Make sure you have all the right tools before you start building a fence. You can either buy the tools individually based on what you need or buy a DIY fencing kit. A good measuring tool or even just string is a must for any type of fence to help ensure you have a straight fence at the end. Before you buy a standard list of tools, check it against what type of fence you are building.
A wooden fence, for example, may need a saw to adjust its height or style. If you have an aluminum or chain link fence, it’s unlikely you’ll need a saw. Screws as well will vary depending on the fence material. Deck screws help prevent corrosion when used with pressure-treated wood or metal. With untreated wood, Calvinized screws are recommended instead. Knowing the right materials for your fence helps save money, as well as ensure a long-lasting fence.
Fencing materials
The material of the fence will play a key role in both its appearance and durability. Prices will also vary depending on what material you choose and range from low to high-end costs. It’ll also play a role in how much maintenance your fence will or won’t need. With that in mind, shop around before you buy. Look online or at your neighbours to see what style of fence and type of material they have. Once you have an idea of what style you like, you can choose a material to match.
Metal
For a very low-maintenance option, metal is the recommended fencing material. Wrought iron, steel, and aluminum are the common types of metal used in fences. Metal itself is also incredibly long-lasting, so once installed will have a lifespan of 15-20 years. The aesthetic value and design options likewise make this material a top contender. Wrought iron fences add a high-class appearance, while aluminum offers a striking complement to any home style. Thanks to the strength and durability of metal as well, it is excellent for security and protection. The downside, though, is that both aluminum and wrought iron are higher-cost options. That said, if you plan to stay in your home for many years, it’s a perfect choice. With its long lifespan and high security and style appeal, it is a well worthwhile investment. It might be advised to have a professional fencing contractor install your metal fence.
Wood
Wood is one of the most commonly used options. It offers a classic appearance and comes in a variety of different styles that are easy to customize to suit your home. It is also in a more moderate price range for fences. While it does need more maintenance and upkeep than other materials, if well cared for, it will last between 15 to 20 years. As for the type of wood, different species offer different styles and benefits for your home:
Pressure-treated pine: The most cost-effective option among wood species is pressure-treated pine. The treatment helps protect the pine from any warping, cracking, or damage from insects. As far as weight goes, pine is also a very lightweight material, making it very easy to install. Pine will need more maintenance than other woods to prevent any rotting or wear. With the right care, though, pine can easily last upwards of 15 years.
Redwood: The colour alone, a natural red brown, is what makes redwood a popular choice when building a fence. The look adds a certain elegance and significant curb appeal boost to any home. Redwood is also incredibly durable and resistant to pests and weather damage. The natural oil it secrets repels insects, while temperature shifts won’t cause it to warp or crack.
Cedar: Like redwood, cedar offers the same resistance and durability regarding pests and weather damage. In comparison, cedar’s natural light colour adds an appealing rustic style that many homeowners enjoy. If left unstained, cedar will eventually fade to an attractive, weathered shade of gray instead. This look is just as popular, but otherwise, apply a stain every few years to prevent any fading.
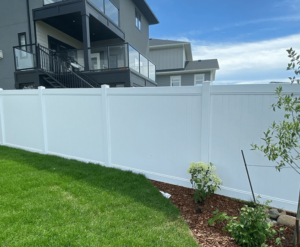
PVC and vinyl fencing
Polyvinyl chloride (PVC) and vinyl are both very popular alternatives to real wood. Not only will they never rot, warp or crack, they also require virtually no maintenance. In the long run, you’ll even save more, since you only pay an initial price to buy and build. Since they are both cost-effective and easy to install, they are perfect for a DIY job. Some vinyl can also mimic the look of real wood, so you get the aesthetic appeal of wood but without the maintenance. Vinyl and PVC also have very long lifespans and can easily last between 20 to 30 years.
Fence designs

Many homeowners build a fence for different purposes, whether that is to increase curb appeal, add function, or improve privacy. Some fences double up on their purposes, such as a privacy fence but with a decorative lattice on top. Decorative fences can boost a home’s curb appeal, while also keeping pets safe and contained. When building a fence, knowing its purpose will help you to choose the best design. There are various styles, but here are a few more popular styles:
Scallop fence
With this, the posts stand as the highest point while the pickets run in an inverted curve. Visually, this design is both very eye-catching and highly attractive. It is ideal for a decorative addition, but taller scallop fences can also be protective, such as for keeping in pets.
Flat top
As its name suggests, flat top fences offer a clean, straight line across the top. The uniform look is simple and works as a functional fence. For pool fencing, the flat top is a popular and well-suited choice. Simple backyard fences as well, pair well with this design.
Shadow box
This design uses alternating pickets to create the same design on both sides of the fence. For neighbours, this design is the perfect way to have a fence that looks good from both sides of the property. The staggered design also allows more light and air through, so while it does add privacy, it isn’t as closed off as a privacy fence.
Picket
One of the best-known fence designs is the picket fence. This design is popular, because it offers both security as well as curb-boosting décor for your home. The height can be made taller or shorter, and the pickets spaced farther apart or closer together. This easy customization means it can be paired with any home’s architectural style.
Privacy
These fences are meant to block any outside views into your yard, either from neighbours or the street. They are also generally much higher than other standard fences. In addition to the appeal of privacy, these are easily customized. Some fences are solid wood, while others can be made entirely from a latticework design. Most often, the style and material of a privacy fence are chosen to complement the surrounding landscape.
How to build a fence
With the right materials and established design and purpose in mind, you can start building a fence. The work itself is a simple step-by-step process broken down between the posts, panels/rails, and post caps. Before you start, lay out each post to help visualize where everything will go. That will also help later with positioning each post and ensuring that everything lines up once the work begins.
Step 1: marker
Use either spray paint or chalk to mark 6–8 feet between each fence post. This distance will help prevent the fence itself from sagging after it is installed and to provide extra stability. A good rule of thumb when digging the post hole is to make it three times the width and 1/3 the height of the post deep. If you live in an area where frost is a problem, dig beneath the frost line to prevent heaving.
Step 2: posts
Add 3-4 inches of gravel, leveling it first before adding 6-8 inches of concrete mix on top. Then, place the post inside the hole and use a level to make sure that it is even and straight. Bracing each post will additionally help prevent it from shifting as the concrete cures. Afterward, fill the hole with dirt to finish setting the posts.
Step 3: rails or panels
Depending on the type of fence, the next step is to attach the rails or panels to each post. Attach a piece of string between each post to help when lining up each rail and ensuring it is straight. If you are installing panels or a more complicated design, this step will take longer.
Step 4: pickets
This step is only necessary if you are installing pickets on your fence. Otherwise, you can move on to the next step. Just like when attaching the rails, use some string as a guideline to ensure a straight line. Keep in mind that either deck screws or galvanized nails are best for securing both the rails and pickets on both wood and metal fences.
Step 5: post cap
To finish the fence, put a post cap on the end of each post. These act as decorative touches and also help protect the posts from any damage. Simply tap it down until each cap is snug and secure.
Step 6: optional stain
Staining or treating is only necessary for wood fences and is an optional step. Some wood, such as cedar, can be left alone to let it eventually fade to an attractive grey. Other types of wood can be stained with a new colour, or a weather-proof finish can be added for extra protection. If a stain is added, remember to reapply a fresh coat at least every 2-3 years.

Get started!
Building a fence is a great project and learning experience, just as long as you carefully plan and prepare. The right tools, a game plan, and established budget will help ensure your new fence is a cost-effective and value-boosting installation. If you are unsure about any steps, just call a professional for help. Even the company you buy your materials from will have plenty of tips and suggestions to offer.
Find a RenovationFind certified fence contractor company now!

| Alberta | British Columbia | Saskatchewan |
| Edmonton Fence Builders | Kelowna Fence Builders | Regina Fence Builders |
| Calgary Fence Builders | Vancouver Fence Builders | Saskatoon Fence Builders |
| Victoria Fence Builders | ||
| Manitoba | Nova Scotia | Newfoundland |
| Winnipeg Fence Builders | Halifax Fence Builders | St. John’s Fence Builders |
| Ontario | Quebec | New Brunswick |
| Toronto Fence Builders | Montreal Fence Builders | Fredericton Fence Builders |
| Barrie Fence Builders | Quebec City Fence Builders | Moncton Fence Builders |
| Hamilton Fence Builders | Saint John Fence Builders | |
| Kitchener Fence Builders | ||
| London Fence Builders | ||